Integration guide
Accept payments with a single implementation.
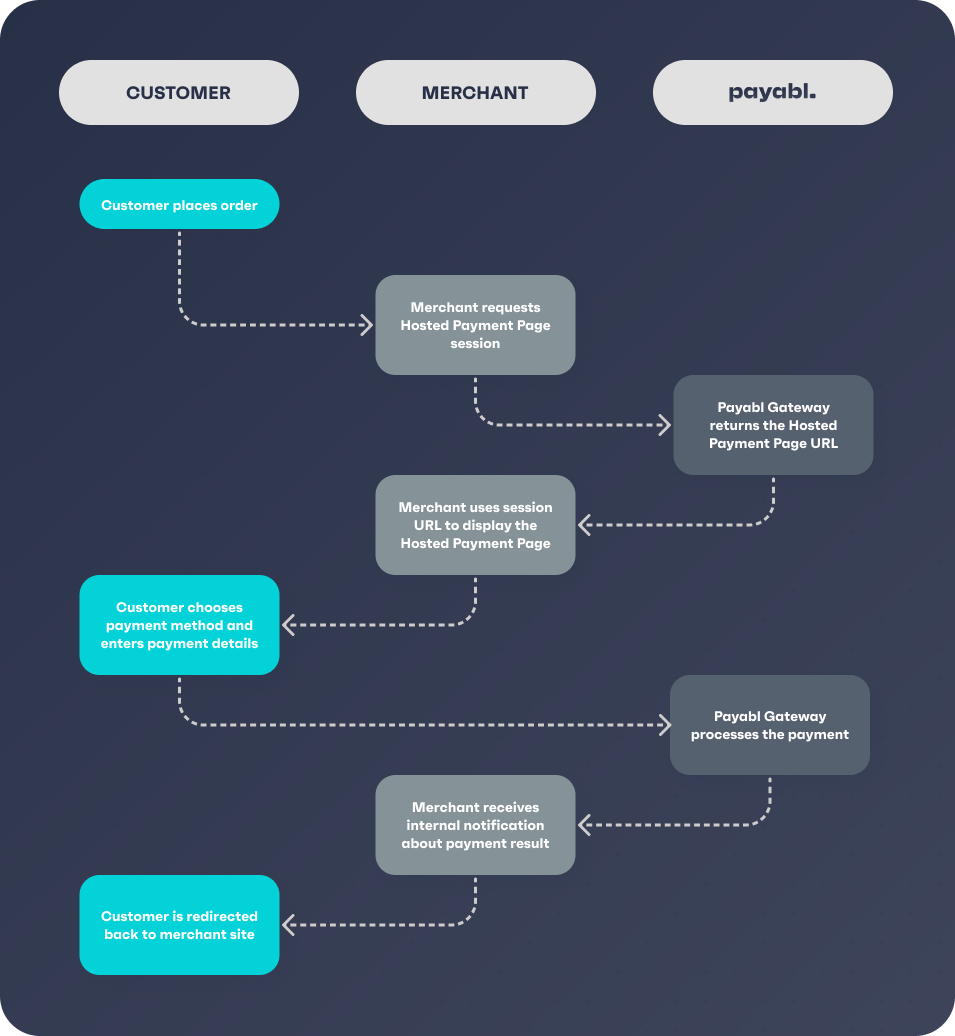
Accept card payments with a Hosted Payments Page—a fast and easy way to collect your customer’s payment information, process the payment request, and handle authorization.
How it works
When your customer is ready to check out:
- Send a Hosted Payment Page request and pass through all the payment information. like the amount, currency, country, and etc.
- payabl. will use this information to send you the link to iFrame to which you will redirect your customer to make their payment.
- Once your customer fills in the required payment details, we will process the payment and handle the authorization flow.
- And after the payment has been successfully processed, you will receive a notification message.

Get started
Step 1. Send initial request
You need to send a init payment request from your server to payabl.
https://sandbox.payabl.com/pay/payment/initIn request, include:
| Parameter | Format | Description |
|---|---|---|
merchantid | 40 characters | Merchant identification number assigned during account creation |
orderid | max. 40 characters | The field orderid is optional and exclusively for the merchants' convenience |
amount | digits only, either no decimals or two decimal places (e.g. 8 or 8.50) | Transaction’s total amount that will be deducted from the customer |
currency | 3 characters. ISO 4217 | The currency field contains the alpha-3 currency code for the transaction. Links to ISO |
signature | 40 characters | Signature Calculation |
email | max. 50 characters | Customer email. An RFC 822 compliant email address |
firstname | max. 50 characters | First name of the customer. Mandatory for Credit Cards, Apple Pay and Google Pay. |
lastname | max. 50 characters | Last name of the customer. Mandatory for Credit Cards, Apple Pay and Google Pay. |
notification_url | max. 255 characters starting with http or https | URL for notifications |
url_return | max. 255 characters starting with http or https | URL for customer redirection |
customerip | max. 39 characters | The customer's IP address |
Initial request example
merchantid=gateway_test&amount=543.00¤cy=EUR&orderid=ORDER-00005&language=en&gender=M&
lastname=Mustermann&street=Bockenheimer Landstr.&zip=60323&city=Frankfurt&country=DEU&
customerid=cust-123456&salutation=Herr&title=Dr.&firstname=Max&company=Siemens AG&birthday=01011970&
house=123&postbox=TEST&state=Hessen&[email protected]&phone=069-777-77-0&
fax=069-777-77-15&mobile=0179-777-77 77&custom1=max 255 chars&custom2=max 255 chars&
custom3=max 255 chars&customerip=212.212.212.212&
url_return=https://www.merchant-webshop.de/payment/success.php&
signature=5b126b925a04ace243412769c8ed660e32a9c112payabl. will send you a response to your server with the following parameters:
errorcode: Error code of the initial transaction, returned by the payment gateway to the merchant's server. Equals0if a transaction was successful, ornumeric_error_codein case an error occurred.errormessage: Error message related to the error code.sessionid: the session id for the customer.transactionid: The field transactionid contains the transaction’s identification in the payment gateway. The transaction ID is generated within the payment gateway for a Preauthorize request or an Authorize request and is sent back to the merchant's system.start_url: The URL for redirecting the customer to the payment page.user_id: Payment system user identifier.
Response example
errorcode=0&errorcodes=&errormessage=&sessionid=4da5686ae4fad9704ef80e39e1f65ccac1751aa5&transactionid=105936790&user_id=1056479&start_url=https%3A%2F%2Fsandbox.payabl.com%2Fhpp%2Fen%2Fstart%3Fsession_id%3D4da5686ae4fad9704ef80e39e1f65ccac1751aa5Step 2. Redirect the customer
You should redirect the customer to start_url (payabl. payment page) after receiving response from our server. When the customer redirected, he will be presented with various pre-configured payment methods.
Our hosted payment page can be present to the customer as imbedded iframe inside you page, or can be presented as a popup.
Step 3. Submit a transaction
When the user selected payment method on the iFrame for the payment, he needs to provide payment details. Based on selected payment method, customer may indicated card details, IBAN and BIC, or wallet account credentials.
When all necessary data are provided, payment can be submitted by customer for processing to the payment gateway.
While using iFrame interface, the customer is always able to cancel the payment process, except after payment was confirmed. After clicking the “Cancel” button, the customer will be redirected to the merchant’s page with a payment transaction, and merchant will receive an internal notification message about this fact.
Step 4. Redirecting the customer to Return page and Receiving callback
The last step for a Hosted Payment Page, will be a redirection of the customer to url_return after the result of payment attempt is displayed to the customer:
- payabl. will send HTML response which can be displayed on your Return URL
Response example (for decline):
errorcode=-10001&related_token_ids=&3dProtocolVersion=2.2.0&type=order&transactionid=105937142&
errormessage=3DSecure+verification+failed+or+incomplete&3dauthentication_flow=challenge_flow&
3dauthentication_status=N&orderid=ORDER-00005×tamp=1722343677&
security=f9b33e2270eefc742e709e578da41e41a86a5dd6df3feac7349943b2bf245fc4
Additional 3DS error information on your Result pageYou should include value form the field 3dcardholderInformation to your Return URL page in order to provide more details to your cardholder. This field shows a response directly from the issue on further authentication steps.
The field 3dcardholderInformation is present only in case an Issuer provides this info.
- Callback to
notification_urlwith the security parameter, which you will need to use in order to verify the authenticity of the notification. Signature Calculation.
Callback example: (for success)
3dstatus=VERIFIED×tamp=1722343778&orderid=ORDER-00005&errorcode=0&type=capture&related_token_ids=&
errormessage=&3dauthentication_flow=challenge_flow&3dProtocolVersion=2.2.0&transactionid=105937169&
3dauthentication_status=Y&security=4f77617275d09fe3f13a74d52f6900b1bd124eb52fb0b9fa99c78a0969179057HTML response/Notification fields reference:
| Parameter | Description |
|---|---|
transactionid | payabl. internal transaction id. Please use this transaction id when referring to the transaction in communications with the payabl. team |
type | Transaction type |
errorcode | Transaction error code (0 for success) |
errormessage | Brief explanation of transaction decline reason (empty on success) |
orderid | Optional transaction identifier given by the merchant |
security | Signature to verify the authenticity of the notification. You can find more information here |
timestamp | Notification timestamp |
3dProtocolVersion | 3DS protocol version (will be 2.2.0 in most cases until further notice) |
3dauthentication_status | 3DS authentication status (possible values: Y, A, N, U, R) |
3dauthentication_flow | 3DS authentication flow (e.g. frictionless_flow) |
3dcardholderInformation | Only added on declined transactions to provide additional explanations to the customer. Present if bank sends it. |
You may find a full list of decline reasons in the annex.
To repeat/retry the payment, the order must be submitted by the merchant again.
Our Technical Support team is there to help you:
Email: [email protected]
Available Monday – Friday between 09:00 and 17:00 CET/CEST
Updated about 2 months ago
