Integration Steps
Start with steps when preliminary steps (Get Session ID) in the Initiating Session are successfully done.
Detailed Workflow with Description
Here is a detailed workflow as well as a step-by-step description of how the integration with the Web SDK works:
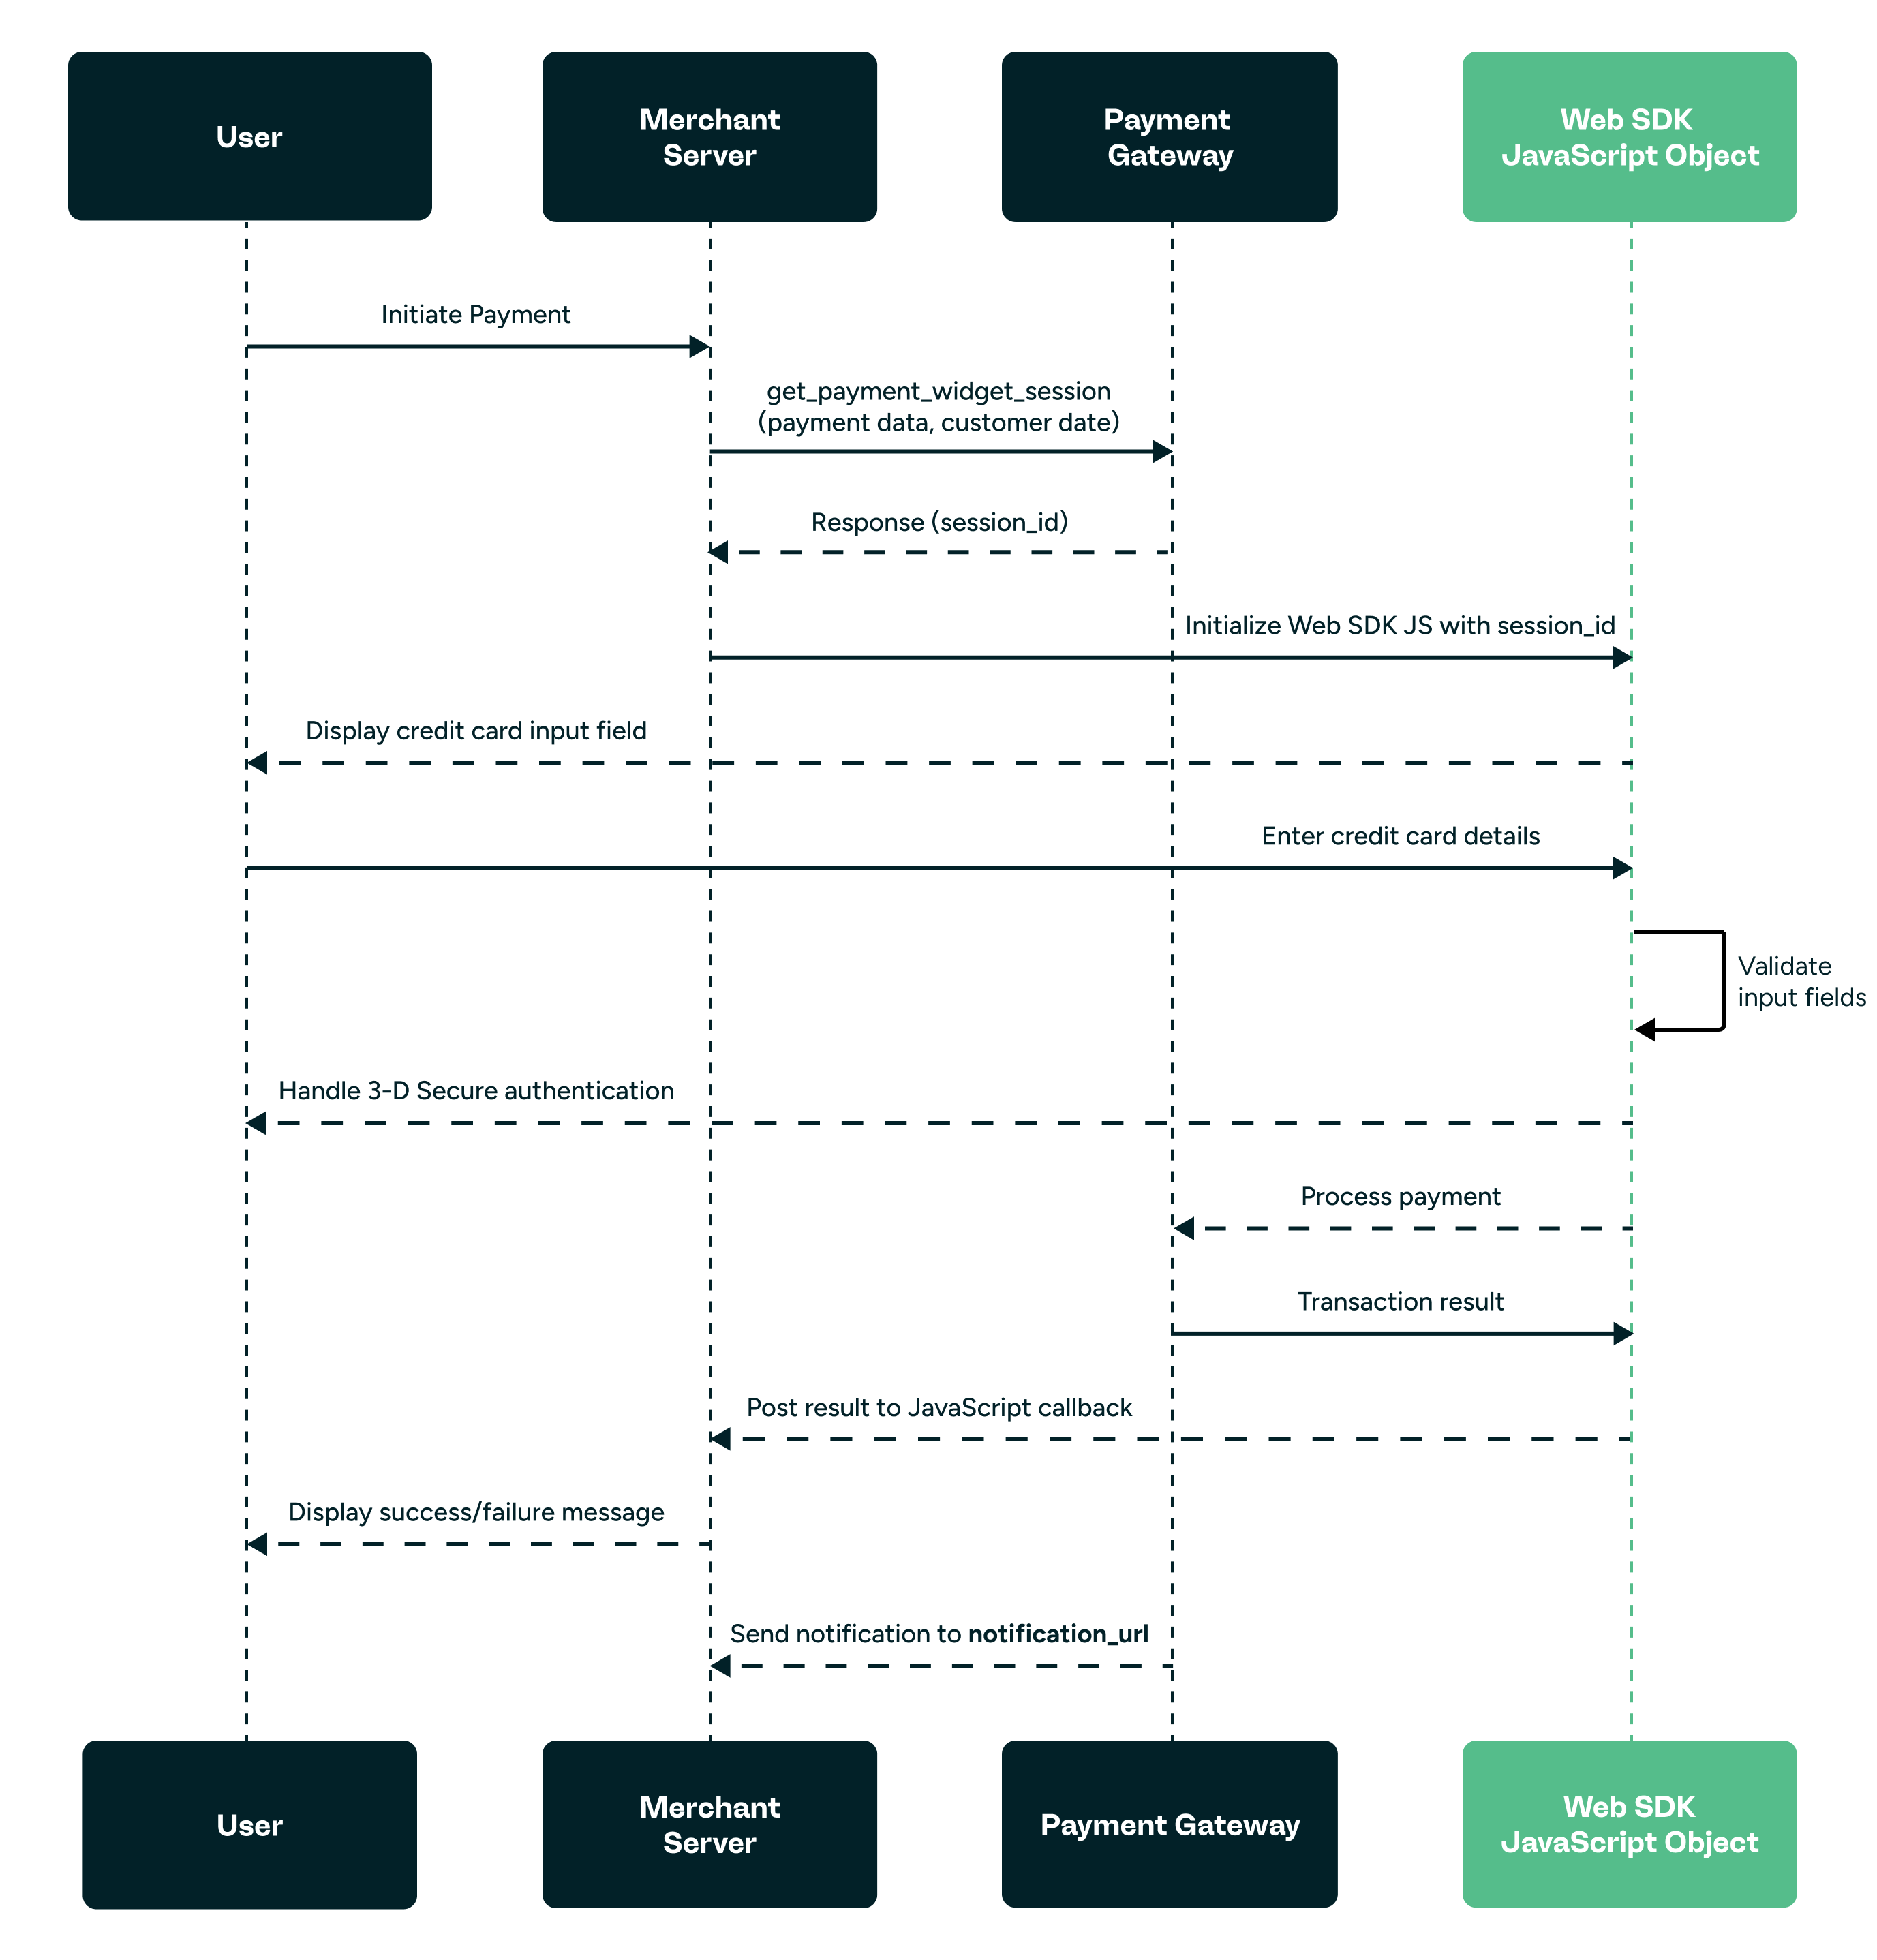
Web SDK - Detailed Workflow
Detailed Workflow Description
- In the server to server
get_payment_widget_sessionpayment request, the payment gateway should receive all required and optional parameters (Payment Data and Customer Data) from the merchant’s server for payment processing. - The payment gateway sends the merchant response that includes the initial URL (
session_idparameter) for using with the Web SDK JavaScript. This is only possible if merchant's server receives a successful response from the payment gateway after theget_payment_widget_sessionpayment request. - Once it has been successfully created in the Web SDK, the customer will be presented with the credit card input fields.
- After all the fields are completely and correctly filled in, the customer can proceed and submit the payment.
- If the card is required for 3-D Secure authentication, the Web SDK handles it seamlessly. No need for the merchant to take any additional action.
- Once the transaction is complete, the Web SDK will post the result of the transaction to a JavaScript callback provided by the merchant.
- The merchant uses this message to inform the customer of a success or failure and to take the necessary actions to take control of the page.
- The merchant should not use the result of the callback notification to update its system. Instead, there will be a notification sent to the
notification_urlprovided in the server-to-server request.
Web SDK Display Modes
Our Web SDK offers two display modes for integrating the payment widget into your website: Modal and Inline. The payment widget mode is configured in Payabl.object and is set by the widgetMode parameter. The default value is "inline."
Modal Mode
In modal mode, the payment form appears as pop-up overlay on top of your webpage. This mode is useful when you want to keep the main content of your webpage visible while the user completes the payment process. The modal includes a credit card form and a submit button, which can be customized with text like "Pay $1.23"
Inline Mode
In inline mode, the payment form is embedded directly within your webpage. This mode seamlessly integrates the credit card form into your page layout, making it part of the overall design. Users can fill out the payment details without leaving the current page view.
Both modes handle the full payment process, including 3-D Secure authentication if required, and provide callbacks to post the transaction result back to your website. You set one of these modes for your website while initiating payabl API. Please refer to Step 4 of the following integration step-by-step guide.
Steps to Integrate with the Web SDK
Step 1: Get a Unique Web SDK sessionid
sessionidPut the Signature to server-to-server request to get the sessionid. Refer to Payment Data and Customer Data Parameters to get sessionid
https://sandbox.payabl.com/pay/payment/get_payment_widget_sessionhttps://pay4.payabl.com/pay/payment/get_payment_widget_sessionPOST https://pay4.sandbox.payabl.com/pay/payment/get_payment_widget_session?merchantid=gateway_test&amount=1.23¤cy=EUR&[email protected]&customerip=127.1.1.1&shop_url=https://127.0.0.1:5500&signature=7c57c5629154d8d39c966cb1e5c4068826c18523Step 2: Include the SDK Script
Reference the Web SDK library in your HTML form:
...
<script type="text/javascript" src="https://pay4.sandbox.payabl.com/hpp/js/sdk/latest/payabl_sdk.js"></script>
...
Step 3: Add HTML Placeholder in Your HTML Form
...
<div id="creditcard-placeholder">
    <!-- Payabl. widget will be inserted here. -->
</div>
...
Step 4: Initiate Payabl. API
Payabl. APICreate an instance of the Payabl. API in your JavaScript code using a Payabl. object.
Payabl.initialize({
       sessionId: 'YOUR_SESSION_ID', // REQUIRED. Received during server-side authentication,
       env: 'sandbox',
       widgetMode: "modal",
       modalPayButtonText: "Pay $1.23",
       callback : callbackNotification,
   });
Switching from Sandbox to Live Environment
When you are ready to go live, change the env parameter to live in your JavaScript initialization code:
Payabl.initialize({
    sessionId: 'YOUR_SESSION_ID', // REQUIRED. Received during server-side authentication
    env: 'live', // REQUIRED. Set this to 'live' for the production environment
    // other parameters...
});
Additionally, update the Web SDK URL to the production version:
<script src="https://pay4.payabl.com/hpp/js/sdk/latest/payabl_sdk.js"></script>
NotePlease remember, in the sandbox environment, the
shop_urlparameter must always be set tohttps://127.0.0.1:5500value. No test transactions can be performed in the production environment.
Here are the properties of Payabl.initializeand their descriptions:
Note: * for required parameters.
| Property | Values | Default Value | Description |
|---|---|---|---|
| sessionId * | N/A | ID generated during server-to-server init API request. See init section for details. | |
| env * | sandbox | live | live | sandbox – this is used during the integration phase. live – used to send live cards numbers. |
| callback * | JavaScript function | N/A | After the payment is completed this is used to post the result back to the merchant website JavaScript. See callback section for details. |
| widgetMode | inline | modal | inline | This controls the display mode of the credit card. The “inline” mode seamlessly embeds the credit card form into the page. The “modal” mode shows a modal form with credit card form and submit button. |
| modalPayButtonText | “Pay” | This is used together with “modal” mode to customize the text of the button. See screenshots section for an example. | |
| locale | ISO-639-1 alpha-2 | en | The language in which the payment form will be displayed. ISO-639-1 two letter code |
| secure3dMode | window | modal | modal | This mode determines how the 3DS form will be displayed. |
| validationCallback | JavaScript function | N/A | This callback will be called whenever a successful form validation is performed on our side. This information can be used to enable the submit button on the client's side. Only relevant for widgetMode set to "inline". |
| paymentMethods | Array [1, 119, 121] | Array [1] | By default, the SDK will only display the credit card form (method id 1). To additionally display applepay (method ID 119) or googlepay (method ID 121), the corresponding method IDs need to be added to an array and set as paymentMethods. |
| iframeHeight | string (Positive integer + px or %) | N/A | Defines the height of the payment iframe. Accepts a string consisting of a positive integer followed directly by either px (absolute pixels) or % (relative to the parent container), with no spaces in between. "500px": sets the iframe to 500 pixels height "80%": sets the iframe to 80% of the parent container's height |
Note
- It is crucial that Apple Pay and / or Google Pay are preliminary enabled for the used merchant ID
- Make sure to handle payment sessions appropriately by following the session ID retrieval process outlined in the Get Session ID Guide. Note that the session ID is valid for 15 minutes after it is created.
- If you encounter any issues or need further assistance, please refer to our detailed FAQ for Web SDK Integration or contact our Technical Support Team at [email protected], Monday to Friday, 9:00-17:00 CET/CEST
Step 5 (optional): Design Customization
Set Web SDK style in your JavaScript code. For the detailed description of how to change Web SDK style view, please refer to Design Customization section.
Payabl.setStyle(customStyle)const customStyle = {
input: {
color: "green",
fontSize: "12px",
borderRadius: "0px",
borderColor: "red",
backgroundColor: "pink",
height: "70px",
padding: "5px",
pseudoStyles: {
hover: {
color: "red",
backgroundColor: "lightgray"
}
},
},
select: {
color: "green",
fontSize: "12px",
borderRadius: "0px",
borderColor: "red",
backgroundColor: "pink",
height: "70px",
padding: "5px",
},
label: {
color: "purple",
fontSize: "12px",
marginTop: "0px",
marginBottom: "0px",
},
tabSlider: {
height: "60px",
backgroundColor: "cyan",
borderColor: "red",
borderWidth: "1px",
borderStyle: "solid",
borderRadius: "0px",
},
savedCardBox: {
borderColor: "cyan",
borderWidth: "1px",
borderStyle: "solid",
borderRadius: "0px",
backgroundColor: "yellow",
},
slider: {
borderColor: "cyan",
borderWidth: "1px",
borderStyle: "solid",
borderRadius: "0px",
backgroundColor: "yellow",
},
savedCardsBox: {
minWidth: "300px",
width: "420px",
marginTop: "160px",
},
newCardBox: {
minWidth: "300px",
width: "420px",
marginTop: "160px",
},
};Step 6: Render the Widget
This will embed the credit card form in the browser
Payabl.create(document.getElementById('creditcard-placeholder'));Step 7: Final Step: Submit the Payment
AttentionIn case of using “modal” mode it renders the payment form in the user's browser, and you must not do the final step (Step 7).
Submit the Payment by calling createPayment method. Add an event listener to a button. If you use “inline” mode, this step is required.
Payabl.createPaymentlet pay_button = document.getElementById("submitButton");
pay_button.addEventListener("click", Payabl.createPayment, false);To check the response parameters and their formats please refer to Response Parameters description
Updated 1 day ago